
In this second part of my series where I am making mistakes in public, I’m getting a coloring book print-ready. I’m using the new-to-me program Affinity Publisher to lay it out, and I am using Affinity Photo to get the hand-drawn art ready for layout. Something I learned last time I did this, with Inktail & Friends, is that it’s not as simple as getting a good scan or photo of the art. What you need is just the black lines, saved with transparency (I’ve been saving to png files).
And again, last time I did this I made a lot of mistakes. I’m hoping to avoid those this time, and wind up with a cleaner product. I was dreading this process, to be honest. That’s part of why it took me four years to get back around to it. The last one was so much work (and honestly not a lot of profit, not like a novel). However, I have dedicated fans and that makes me happy. So again, this is a labor of love!
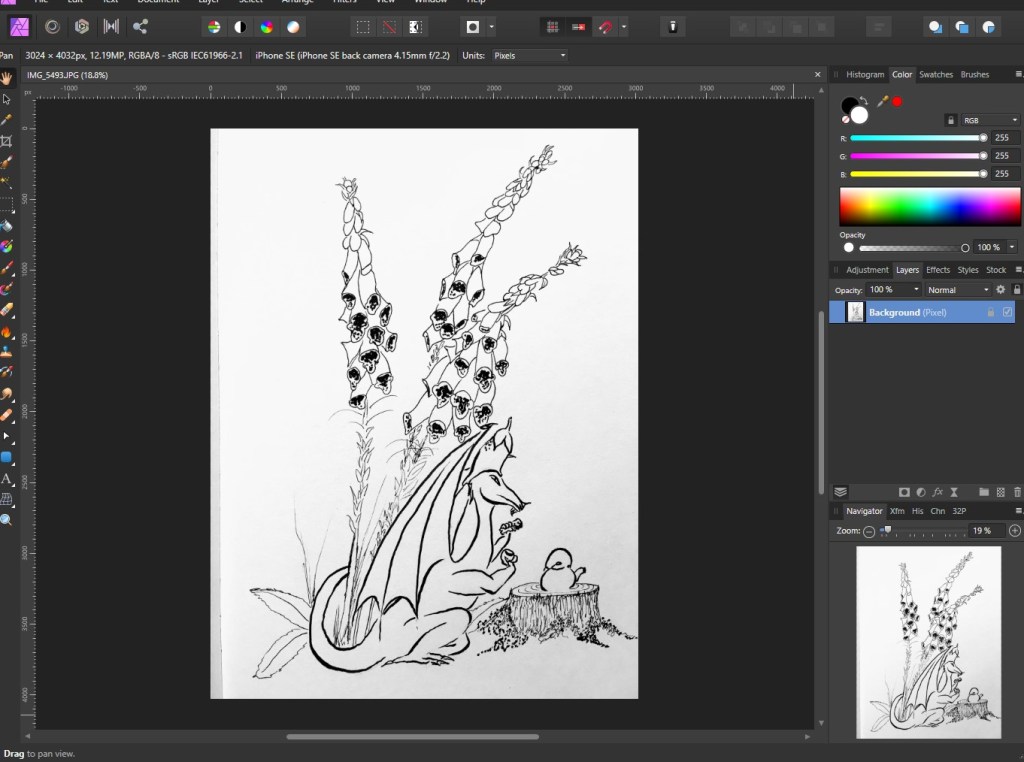
Here, I have photographed a page from a sketchbook, and imported that into Affinity Photo. You can see the shadow on the page has translated to ‘gray’ in the image. If you were doing this properly, you would ensure that you didn’t have any shadows. I have said I make a lot of mistakes? But don’t worry, it can be done away with. Removing shadows just takes a little longer. Why don’t I scan the art? Well, my current scanner is crap. And I don’t feel like spending the money to replace it. In fact, if you squint at the top of this screenshot, you’ll see that I took this photo with my cell phone (I’ll also note I bought my phone for the high megapixel camera, you couldn’t do this with most cell snaps).
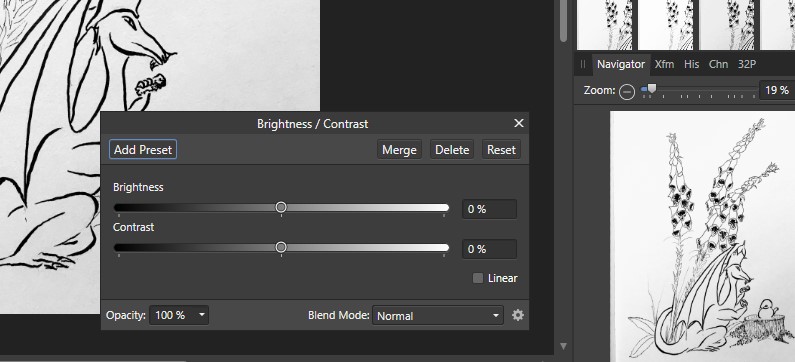
The next thing I’m going to do is eliminate much of that shadow, and get a nice crisp black. I’m going to do this by going to the ‘adjustment’ tab, and then sliding those brightness and contrast bars over to the right – usually about +25 is good, but that’s something which varies. I eyeball it. Doing this allows for a better pixel delineation and when you do the next step, it’s simpler. One thing I usually do here is to merge the photo layer and the adjustment layer, for pixel selection with the selection tool. I’ll also go ahead and create a new layer, and fill that with the bucket tool, in a solid black. This layer goes under the photo layer.
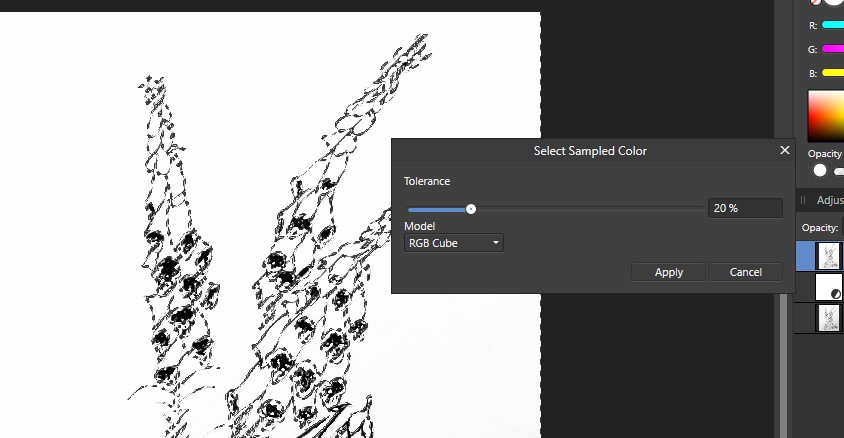
My preference for selecting all the white pixels is to go to the dropdowns at the top of the screen, choose ‘Select’ then ‘select sampled color’ and you will see the box (captured above in screen shot) pop up. Click on the area of photo you want (white space!) and then adjust the tolerance. I found that for my purposes, 20% was usually a sweet spot. You’ll find that if you slide the bead back and forth, the ‘dancing ants’ will move, which may help with the right selection. And you can always ctrl-Z it away if you choose unwisely!
And now that you have what you want selected, hit the delete button. Poof! I like Affinity Photo’s way of doing this better than Photoshop, I don’t have to rasterize and smart object… I just do. What you should see, now, is black on black. This is why we put the black layer under the photo. You won’t see that cleanly, but what it will help with is that gray shadow I pointed out at the beginning.
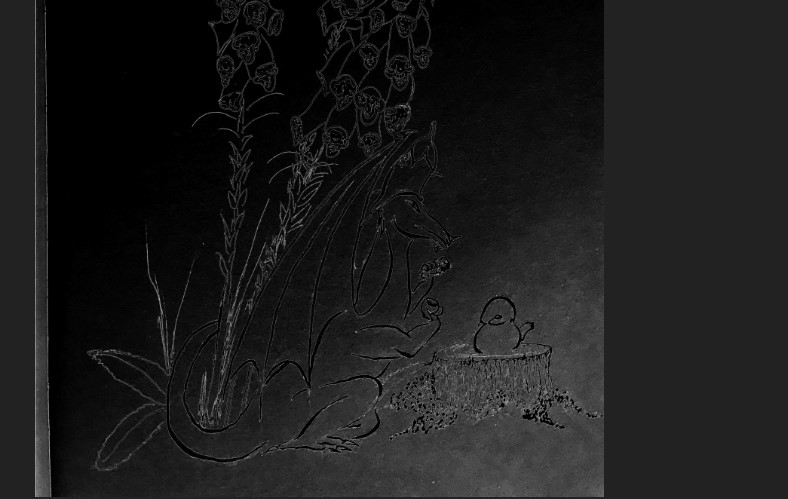
Now you can see all the flaws. I’ll use an eraser brush to get that white line off to the left side of the image – it’s the edge of the paper. I’ll use select by color again (at most, I’ll have to do it 3-4 times, 1-2 is more common) to eliminate the gray pixels. At this point, I’ll hide or delete the black layer. Sometimes, for images with delicate lines, I’ll duplicate the image layer, and then set the top one to ‘multiply’ to make darker linework. And then I’ll save it as a png file, checking the box to not save any hidden elements.

There are a few ways you can port over your images into Affinity Publisher for layout. I usually just go to ‘file’ then ‘place’ or Ctrl-Shift-M to bring in the images I have cleaned up and saved in their own folder related to this project. Here, I’ve put Inktail sipping tea with Foxglove on a page for coloring, and the other page is the back of the image before, left mostly blank in case of coloring with markers, or, as you can see, as an activity page for the colorist.
I realize most of you will never need this tutorial. However, if you happen to want a nice graphic for a book, and you wind up needing to clean it up? This is not the method you would use for a logo, by the way. That is a vector graphic and it’s a whole ‘nother process. I was very relieved to discover how much simpler and faster this process was than the last time I’d attempted it in Photoshop. I had been planning on digitally re-drawing every single image for this book. Which was a daunting chore.
Inktail, Too! isn’t quite print ready. I have to finish up with the text on ‘back pages’ before it’s ready to be sent off to the POD publisher (I’ll be using KDP Print) and I will be creating a color cover flat for the printed version. Plus a single cover for the ebook version, which will be published on my website for downloading and at-home printing. I’m hoping to have the time to get it done before next week, but if not, then it may be two weeks before I finish up this series. I’m in no hurry – I have a sneaking suspicion that printing and shipping proof copies of projects is waaaay down Amazon’s list right now.
Any questions?


8 responses to “Inktail: Preparing Art for Print”
Thanks. I have tended to avoid programs feeling I had to know them well before I used them. This is encouraging (and kind of a tightwire act!) I so enjoy these.
Good, I’m glad they are helping even if I’m just illustrating how to make mistakes! I don’t worry about knowing programs before use. I figure the best way to learn them is by doing. Plus, sometimes (all right, many times!) I have not had any options. Do, or do not, there is no try in small business.
I bought Photo (thanks to last week’s post), and managed to do a simple task (photo montage) without resorting to the manual. (I did a bit with Photoshop back in the days of PS6, and have been mostly been using Paint.NET. Affinity Photo seems to be much more capable, but also a bit more complicated, e.g. wants to always save in its own format, and sometimes I just want to do a quick modification to a JPG).
Affinity sells $50 books on Photo and Publisher…hopefully they’re pretty good. I will probably getting Publisher and Designer, and if I get serious about learning them, the books too.
There are tons and tons of tutorials on youtube, and in the forums, for free. I haven’t splurged on the workbooks, because I’ve been targeting what I need to learn with tuts.
Yup, if you know what you’re looking for, searching (youtube/blogs/whatever) is great. But if you’re trying to learn a new product/technology/etc, well done long form (book and/or video course) is worth it, because you can learn philosophy, capabilities, and why you should do things certain ways much better.
Thanks for this! I have creating a coloring book on my list, and your trick with the black layer for showing up residual gray sounds super helpful.
Of course, my coloring book keeps getting shoved down my to-do list, because I have other projects with higher priority. So I may be kidding myself in thinking I will ever get to it. 😉
If anyone is curious, here is a one of the drawings that would appear in it:
http://jmney-grimm.com/2016/08/page-for-a-coloring-book/
Cool! Zentangle style designs are very popular in adult coloring books. I have been putting this book off for nearly 4 years, so it’s not like I’d know anything about procrastination!
LOL! on procrastination. What writer doesn’t have too many projects for the hours allotted by a day!
The ironic thing about my coloring book is that I conceived the project because I thought it would be fun. (And I still think it would be.) But then I devised a story that I could publish in parallel with it—the story and the images are related, but a reader can enjoy one without the other, ditto for crayon/marker-wielding fan. I suspect you know where this anecdote is going:
The coloring book languishes, while the story was published last year. 😉