Harnessing and Driving
For much of history, horses were mostly used as draft and driving animals.
Riding was for the middle- and upper-classes, because it’s less efficient and because horse-drawn vehicles in Europe had almost no suspension systems until 1500. It was an uncomfortable way to travel, and many drivers of horses or oxen are shown walking beside a laden cart, directing the draft animal from the ground. Merchants used packhorses because they’re more agile and could navigate city streets more easily. Farmers kept plow horses starting around 1500; oxen were more common before that.
A horse can carry only 15-20% of its body weight on its back, but it can drag its own weight in a stoneboat or similar contrivance, and can pull an even more heavily laden wheeled cart for short distances. The sixteen mile an hour races of the Regency were achieved only with very light vehicles and specially bred horses. But all of this requires some specialized tack, known as a harness.
Parts of the harness
A horse harness is usually made of leather. It’s traditionally dyed black, with brass or steel hardware, though rich people of the past would have odd colored harnesses made for them- light blue, bright red, etc., as a form of conspicuous consumption. Most leather is naturally brown, and that’s what farmers, carters, and people of the lower classes used for harnesses. Dying it was expensive and time consuming in the days before chemical dyes, and it was very fashionable in eras like Regency England or pre-Revolution France to ride around in a four-wheeled carriage, pulled by four or six matching horses, all wearing an outlandishly colored harness that matched the carriage’s decoration.
A harness has more moving parts than the tack used for riding, and can be quite complicated. See below on how it’s possible to jury-rig a harness out of other equipment, but for now, let’s talk about a purpose-built harness.

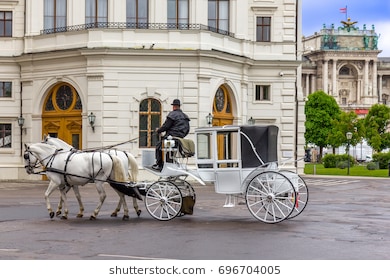
Image courtesy of the Equine Heritage Museum
Because harnesses were custom made until very recently, a large variety in terminology has developed. All of the following terms are the ones I learned; if you discover different ones, consider the source and use your judgment when deciding which ones to include.
A driving or harness bridle has the usual bit, reins, cheekpieces, and throatlatch. But as you can see, it’s not a normal English bridle. The squares of leather covering the horse’s eyes are called blinders or blinkers, and keep the horse’s attention forward (if a horse sees the carriage following behind it, it’s likely to bolt, so blinkers are a safety measure). Many harnesses have no real noseband or cavesson, because of the placement of the blinkers. The reins are about 20 feet long each, instead of the usual 4 feet. A reinsman may use any bit he chooses, but the most common driving bits are the full cheek snaffle, half cheek snaffle, Liverpool, or some sort of pelham. The one in the diagram above is a Liverpool. Driving horses usually need stronger bits than riding horses, because the reinsman is cueing the horse from the end of a 20 foot rein instead of a 4 foot one; some of the strength of the cue is lost in those extra few feet.
Driving bridles also have bearing reins or, to use the correct term, checks. A check is the strap extending from the top or sides of the bridle down to the saddle or surcingle. It serves one practical and one fashionable purpose. Practically speaking, checks prevent a horse from holding its head in a position to evade the bit, like a martingale or draw reins are used in riding. On a more aesthetic level, it keeps the horse’s head up, which makes it look fancier. This makes it difficult for a horse to maneuver on rough terrain, and is tiring. The overcheck, which sprouts from the top of the bridle and goes down the horse’s crest to the saddle, has been banned from most competitions because it has very little ‘give’. Sidechecks, which run through rings on either side of the bridle, just below the horse’s ears, are still acceptable; they’re more flexible than an overcheck. If you’re writing a story that takes place before the mid 1900s, your characters will almost certainly use overchecks. The driving harness belonging to my mother has an overcheck, and it’s probably from the 1950s. As a writer, you can signal a bleeding heart character by having him/her protest against the use of overchecks.
Historical harnesses were often decorated, and one type of ornament was a set of ostrich plumes attached to the crownpiece of the horses’ bridles. These could be dyed all sorts of colors. If you want to see a modern example, look for photos of horse-drawn hearses; the harness, including plumes, is a holdover from Victorian funeral traditions.
The next part of the harness is the saddle. It’s the belly band that holds the shafts of a cart in place. The reins pass through rings on the saddle; if the rings are perched on top of the saddle, they’re called terrets. The tugs also hang off the saddle; these are the loops that the cart shafts pass through, and they keep the shafts from falling downward. The shafts are kept from flying upward by an overgirth, which passes under the horse’s belly and wraps around the shafts. The crupper is another attachment to the saddle; it runs under the horse’s tail and keeps the saddle from sliding forward.
The crupper strap is a double strip of leather; the two strips are sewn together for some of their length, with a small gap in the stitching over the horse’s hip. The breeching (sometimes called holdbacks) runs through this gap and hangs down on either side of the horse’s flank. Breeching is wrapped around the overgirth, usually, and helps keep the cart from sliding forward and bumping into the horse’s hocks. Competitors in the show ring don’t always use breeching, because the ring is level, but if your characters are traveling by horse, it will be included in the harness. Usually, the saddle, overgirth, tugs, crupper, and breeching all stay together as a unit to be put on and removed as one. It can be quite heavy, especially if you’re a small person trying to throw that mass of leather onto a draft horse’s back.
The traces are a piece of harness that often stays with the cart. This is the piece that attaches the body of the cart to the harness. Traces can be attached to a collar or breastplate, depending on how the harness is made, and they are usually double thickness. Cutting a horse out of the traces is possible, if your characters meet with a carriage accident, but it requires a very sharp knife and the ability to get to both sides of the horse without getting kicked. Depending on the exact circumstances, your characters might find it easier to unclip the trace from the ring that attaches it to the carriage. Cut or broken traces will detach the horse from the carriage, and is an excellent way to sabotage a harness.
Modern pleasure driving harnesses don’t usually have a collar, but the collar was invented around the late Middle Ages and is still used for draft horses. Previously, a wooden yoke was used, but this can choke a horse if it’s obliged to pull a large load. The collar is shaped and padded differently, and doesn’t cut off the horses breathing. A collar is made of two hames, joined at the horse’s chest and the withers. The hames are usually wood, with straw padding covered in leather. The traces attach to the collar, so the horse can draw the cart. A horse doesn’t technically pull a cart; it pushes on the collar or breastplate, and the cart comes along with it.
The breastplate is a fairly modern invention. It looks a lot like a polo breastplate, only it has rings on the two ends, to which the traces are clipped. A horse pushes on the breastplate in the same way it pushes on a collar, but the breastplate is made for small horses carrying lighter loads.
To harness a horse
First, tie the horse securely. There are more infuriating things than having a half-harnessed horse run away from you, but I can’t think of any at the moment. Brush the horse as usual, taking care that it’s cleanest where the tack will rest.
If you’re using a collared harness, the collar goes on first, by standing in front of the horse and convincing it to let you slip it over his head. If the harness has no collar, skip to the next step.
The saddle and its accoutrements are added next, by gathering up the whole catastrophe and throwing it onto the horse’s back (try not to scare the horse). Adjust the saddle so it’s a few inches behind the withers (one of the most common mistakes is putting the saddle too far forward; it can be uncomfortable for the horse) and loosely buckle the girth. Put the crupper in place, making sure the horse’s tail isn’t tangled up in it, and untangle the breeching so it falls freely, if the harness has breeching. The overgirth should be draped over the saddle, ready for use, and the tugs should hang freely. If you’re sharing tack with other people, make sure you have two tugs, and that some jerk didn’t run off with one of them. Tighten the saddle girth; you should be able to slip a finger or two underneath.
Slip the breastcollar over the horse’s head, if the harness has one, and put on the bridle. The bridle goes on and is adjusted like an English bridle. Buckle the checks loosely; when pleasure driving, they’re mostly there for decoration. Thread the reins through the terrets, and tuck them into the crupper strap so they rest on the horse’s back.
Now it’s time to attach the horse to the cart. Unless the horse is very calm and experienced, find someone to help you. One person ‘heads’ the horse; they hold the bridle and distract the horse. The other person ‘hooks’ the horse, by bringing the cart up behind the horse, raising the shafts so they don’t poke the horse in the hip, and gently bringing the shafts down and through the tugs. The hooking person moves from one side of the horse to the other, putting the shafts through the tugs, clipping the traces to the breastplate or collar, attaching the breeching to the shafts, and wrapping the overgirth around the whole mess.
The hooker removes the reins from where they were stashed under the crupper strap and climbs into the cart. Once he is settled, the header can let go of the horse’s bridle and mount the cart. As with riding, make the horse stand still until you’re ready to move off.
This procedure is for a two-wheeled, one horse vehicle, which is the equipment I have most experience with. It can be adapted for larger vehicles pulled by more horses. The most important change is that a pair vehicle (meant for more than one horse) is larger and has no shafts. Instead it has a pole, sometimes called a tree, that attaches to the bottom of the carriage and runs between the pair of horses pulling it. The pole is usually attached to a crossbar, which hooks onto the horses’ collars. To keep the pole steady, traces also run up and down both sides of each horse, similar to a one-horse hitch. But the pole is the major point of contact between the horses and the carriage, and if it breaks, your characters are in trouble.
The other major difference in paired vs. single driving is that you need more helpers. One header might be able to hold a pair of horses, but the hooker is going to need a second set of hands if you want to get on the road sometime that day. A team of ostlers at a Regency coaching inn could unhook one pair of horses and hook another pair in less than a minute, but that takes a lot of practice and very understanding horses.
And of course, historical upper and middle class characters would never harness their own horse; that’s what ostlers and grooms are for. A male character might know how to saddle his horse, but he wouldn’t do it except in an emergency, and no proper lady would have the slightest idea of how to saddle or harness a horse.
Driving a horse
Driving a single horse isn’t terribly complicated. ‘Gee up’ (soft ‘g’) or ‘walk on’ gets the horse to go forward, along with a little tap or tickle with a driving whip on the horse’s flank. ‘Whoa’ means stop, just as it does for riding horses. The horse is steered with direct rein pressure, so when you want to turn left, pull back on the left rein. ‘Gee’ (again, soft ‘g’) can be used for turning right, and ‘haw’ for turning left. These are more common with draft horses doing farm work; most pleasure drivers just use the reins.
Driving multiple horses is an exponentially more complicated, especially if they don’t get along. Horses can be driven as a pair, side by side, or one in front of the other- a tandem hitch. It’s also possible to drive three horses- three abreast is a troika hitch; a pair of wheelers with one in front is a unicorn hitch. Four or more horses are usually driven in side by side pairs with one pair in front the other. Wheelers are closest to the vehicle, the swing pair (or pairs) is in the middle (for a six or eight horse hitch), and the leaders are in front. Stagecoaches often had a six horse hitch. It’s possible to drive more than six horses at a time, but rarely necessary. Most of your characters will drive a single horse or a pair, or possibly four-in-hand (where the expression ‘driving in a chaise and four’ comes from. I’ll talk more about horse drawn vehicles in the next installment of this post. Another very rare hitch is called the pickaxe/ hammerhead/five-in-hand, where you have a pair of wheelers and three leaders hitched abreast of each other.
The most complicated thing about driving more than one horse is the reins. The horses’ bridles are clipped together at the bit, to keep them from moving away from each other, and the reins are often crossed so the reinsman can hold all of the left reins in his left hand and all of the right reins in his right. Crossing reins are the inside reins- so, the right rein of the left-hand horse and the left rein of the right-hand horse- and are threaded through the terrets of the other horse of the pair so the reins cross in midair between the horses. Occasionally you will see paintings of a four- or six-in-hand where only the leaders’ bridles have reins; it was assumed that the wheelers and swing pair simply followed the horse in front of them and didn’t need to be directed. In a multi-pair hitch, the wheelers do most of the hard work; the leaders are the flashiest pair.
Those are the basics of driving a horse. Next up: travelling with and by horse, including a primer on horse-drawn vehicles.


8 responses to “Writer’s Guide to Horses Part IX”
Re-thanks for an interesting and informative post.
These posts are amazing–Thank you again for taking the time to write them up. Have you considered writing a writer’s guide to horses?
I’m hoping to put out a compilation of these posts- possibly with some added material- sometime early next year. The hard part is finding diagrams I can use. Photos are pretty easy, but scientific diagrams aren’t usually released under Creative Commons, and aren’t labeled when they are. But there will be kindle and paper version of A Writer’s Guide to Horses, never fear.
I’ve always considered harnesses amazingly complex. Having evolved over millennia, though, I can’t say they’re _unnecessarily_ complex.
Black dye for leather was made by rusting iron bits in vinegar.
Bob Skelding has written a very interesting webpage about his travels around the US in a horse-drawn caravan using three draft horses (usually as a pair with one horse resting on lead behind the caravan, but occasionally in a unicorn hitch). It makes for interesting reading about the modern real-world application of this harness. It’s at: http://wagonteamster.com/index.html
That site looks pretty neat. At first I wondered if that guy was the same one that stopped at my family’s farm when I was a kid (he was going from Maine to Florida and last I heard he was in Missouri), but it’s a different person. Cool to think that people still travel cross-country by horse.
In case this got missed on the page with “what would you like to see Mad Genius Club do in the future?” I said that I would like to see a page like the Writing Navigation tab with compilations of posts like THIS. “Writer’s Guide to Horses,” “Writer’s Guide to Small Firearms,” “Writer’s Guide to Battles,” and so on.